RobboNet
Quick Turret (Tower Defence Project)
GitHub
I started this project one night on a whim - just build a turret as fast as possible to show myself how much I'd learned. It then became a great platform to advance my skills.
I'd been playing a lot of Risk Of Rain 2 and felt inspired by the design of the game. I know the game is made in Unity, and I'd spotted several things that to me were symptomatic of the game's code being well structured.
Risk Of Rain's damage system can handle a plethora of interacting damage types and status effects being dealt between players, turrets, enemies, and environment features - all at once in massive quantities. This inspired me to start expanding this project, and after many iterations this is the latest demo:
The Systems
After struggling with scaling complexity in the KSP Companion Prototype, I focused this time on creating modular systems that work well with Unity's GameObject/Monobehaviour component system. This resulted in the following systems:
The Waypoints, Damage, and Targeting systems are all mutually independent of one another, and may be readily reused in another project. The turrets and enemies in the demo then use these systems to implement their behaviour, along with some bespoke components.The Waypoints System
GitHub Directory
This was the first system to be built. This system is used by the enemies to navigate around the path. Originally the game had a more complex path with many branches, and this system was up to the task of guiding enemies towards the end. The Waypoints System has four classes, two of which are MonoBehaviour components:
- Waypoint
- WaypointConnection
- Waypoints (MonoBehaviour)
- WaypointsNavigator (MonoBehaviour)
The Waypoints component then integrates said digraph with a Unity GameObject, while a WaypointsNavigator component offers a simple API for navigating around a graph of Waypoints. The Waypoint and WaypointConnection classes are in theory extendable with weights and more, enabling custom and complex navigation of the waypoints - I did envision 'line-like' and 'area-like' Waypoints to coexist with the point-like Waypoints, but in reality implementing this wasn't within the scope of the project.
The Waypoints Editor
After a painful experience using the default Inspector to set up the waypoints by hand, I knew it was time for me to learn how to customise the Unity Editor. I set about learning about how Unity serialises the data in your components, and how to create custom Inspector and Scene behaviour by extending the
I was really happy with the final result. In the Unity Inspector you can change the name, reposition, reconnect, or delete a Waypoint. The Scene view has custom behaviour that's even more powerful however. Via handles you can relocate waypoints, append new waypoints, add and remove connections, and split connections in half. The Scene view also features a custom GUI can be expanded or hidden, and thanks to some hotkeys the Scene view workflow is really smooth:
The Damage System
GitHub Directory
To handle the dealing of damage I then created the Damage System. There are a few structs and classes composing the Damage System:
- DamageEffect
- DamageType
- Hurtable (MonoBehaviour)
- HurtableStats (ScriptableObject)
Hurt() method on any Hurtable component.Using the DamageSystem to deal damage is thus very simple: if you have something you want to take damage, give it a Hurtable component; if you have something you want to deal damage, have it create DamageEffect instances and call Hurtable.Hurt(). When you need your other components to react to taking damage (or dying) there are then OnHurt and OnDie events that components can subscribe to.
The DamageText Subsystem
To visualise dealt damage I also made the DamageText subsystem:
- DamageText (MonoBehaviour)
- DamageTextFactory (MonoBehaviour)
- DamageTextSettings (ScriptableObject)
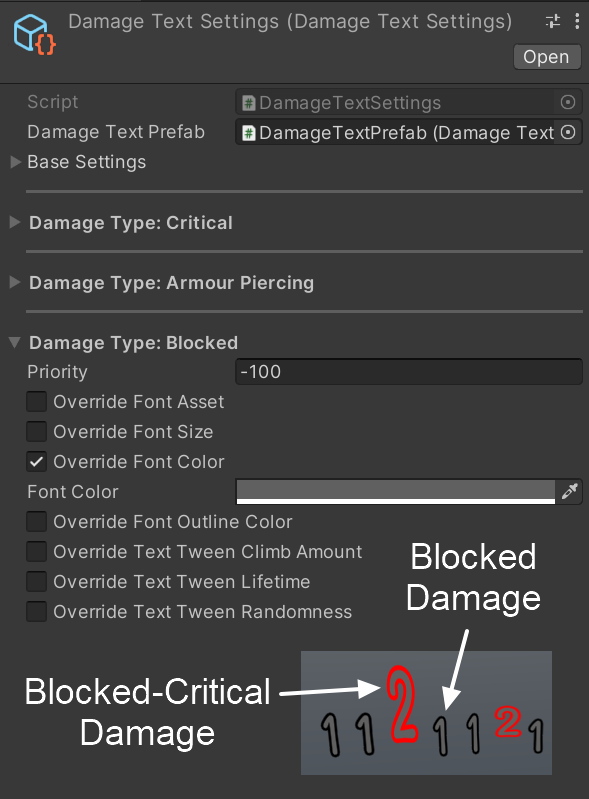
OnHurt event is published. The DamageText component simply handles the tweening of the prefab over its lifetime.The DamageTextFactory checks the DamageType of the incoming damage, and then uses a DamageTextSettings object to set the appearance of the text prefabs. The settings contained in a DamageTextSettings object allow for some really nice behaviour, where certain types of damage can take priority and override the cosmetic effects of lower priority effects. For example, its important that players know when their damage is blocked, so dark grey blocked damage has a high priority.
The DamageTextSettings Editor
With the help of another powerful custom Editor, a DamageTextSettings object allows for the final appearance of a DamageText instance to represent several present DamageTypes all at once. Each DamageType has a priority value, so its styling can override another DamageType. However, each DamageType also can leave a styling unset, enabling its appearance to be altered by another DamageType of a different priority. A common example of this in the demo is blocked-critical damage - the text is styled as critical damage, except its colour is overridden to dark grey:
The Targeting System
GitHub Directory
Next we have the Targeting System. This system allows for GameObjects to detect potential targets, prioritise between them, and then select one of several potential subtargets. It uses the following classes:
- TargetScanner (MonoBehaviour)
- Targetable (MonoBehaviour)
- Subtarget (MonoBehaviour)
- TargetingTag
- TagsAsset (ScriptableObject)
- TagPriorities (ScriptableObject)
The default behaviour of the TargetScanner is to sort the detected Targetables by their distance to the scanner. However, in order to facilitate target prioritisation I then created a system of tags. Targetables can be given tags as defined in a TagsAsset object. A TagsPriorities object can then be used to sort the Targetables by their tags.
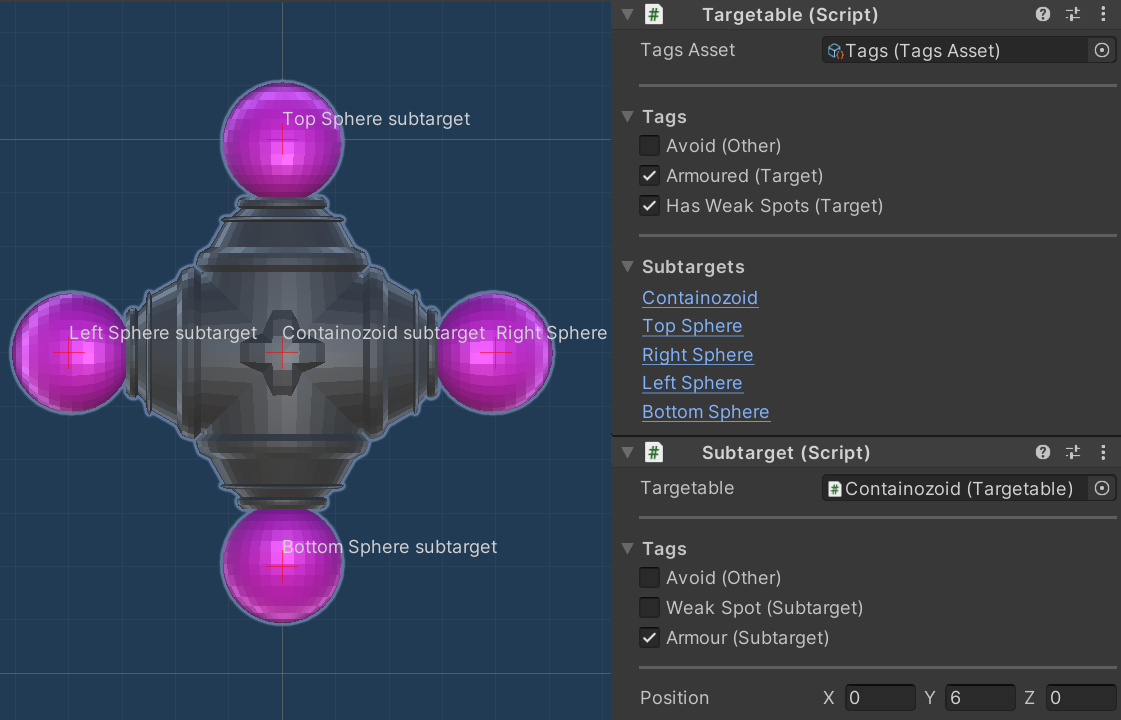
To make enemies more interesting, I also created the Subtarget component. Every Targetable has at least one Subtarget that is automatically created on the same GameObject, but more Subtargets can also be created and registered with a Targetable either through the Inspector or the interface of Targetable. The Subtargets can be moved around relative to the origin of the Targetable, and they have their own subset of tags and thus options for prioritisation.
More Custom Inspectors
Of course, I had to make some custom inspectors and scene gizmos to make it easier to work with the components of the Targetting System.
The Turret Components
GitHub Directory
Finally, I brought these systems together along with some bespoke components to make the turrets. The machine gun, minigun, and sniper turrets all use these components with different variable values to implement their behaviour:
- TurretController
- TargetScanner (Targeting System)
- AttitudeControlSystem
- Autoloader
- RaycastGun
- BulletTrailFactory
The Turret Controller
This component acts as a master controller for all the other components on the turrets. By polling the state of the other components, or by subscribing to their events, the turret controller can then dispatch orders to the other components on the turret.
The Target Scanner
This is the TargetScanner component from the Targeting System described above. Its task is to periodically scan for nearby Targetables and publish a prioritised list of them in an event.
The Attitude Control System
Given a particular Subtarget to aim at, this component is responsible for calculating and implementing the correct orientation of the turret's model. I decided to have all three types of turret use the same base structure in their models so that they could have this component in common.
The Autoloader
I really like the idea in WarThunder of equipping your aircraft with ammo belts that match the target you are hunting. The ammo belt then has a variety of rounds that are cycled through periodically.
The first thing I did to implement this behaviour was to create a ScriptableObject class called AmmoType. Each AmmoType has a name, a colour, an amount of base damage, and then a probability of causing any particular DamageType of the Damage System. The CreateDamageEffect() method can then be used to create a random DamageEffect based on the probabilities defined by that AmmoType.
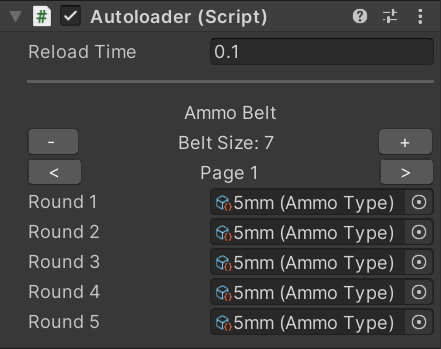
The Autoloader component is then responsible for maintaining an ammo belt composed of various AmmoTypes. The DrawChamberedRound() method returns the AmmoType that is current chambered while a reload cooldown starts and the belt advances to the next round. I made sure that null entries in the AmmoBelt can be skipped over until a non-null entry is found - an exception is only thrown in the event that all the rounds in the belt are null.
There are also methods for manipulating the size and contents of the belt, peeking at the currently chambered AmmoType or a round at a given index, and resetting the belt back to its first round.
Under the hood, the 'ammo belt' is simply a list of AmmoType objects. The default Unity property drawer for this was a poor fit, so as a final touch I made a really nice UI for manipulating the ammo belt in the inspector.
The RaycastGun
This component actually fires at the target. It simply wraps the Physics.Raycast() method such that a degree of spread is applied to the bullet and the Hurt() method is called on any hit Hurtable.
The Bullet Trail Factory
Finally, this component is responsible for creating and styling the bullet trail leaving the gun barrel. The effect is not very obvious, but if you look closely you can see that the colour of the bullet trail reflects the AmmoType of the fired round.